 One of the things I get asked most about (or find myself talking about ad nauseam whenever I get the chance….er-hum sorry friends!) is the healing qualities of bone broths and how to go about making them.
Bone broths are an amazing healing food. They contain a wealth of minerals and amino acids which are the building blocks of protein. They will pretty much cure whatever ails you. They have amazing gut healing properties (think leaky gut; the start of so many of our modern health issues). They are amazing for balancing the immune system and boosting you when you get a cold or flu or any kind of acute illness. They are high in nutrients to help with arthritis and joint pain. They are also amazingly good for your hair, skin and nails because they are full of what hair, skin and nails are made of. Oh and did I mention that they are good for building strong bones. Funny about that!
Bone broths are, as the name suggests, broth made from bones. Often made from Beef or chicken bones, the broth can be made from any bones with one caveat. Please please use grass fed bones (pastured chicken), preferably organic but at least chemical free. I’ll explain why this is so important:
Bones store pesticides and other nasty chemicals and so considering that the whole idea of boiling the bones for so long is to extract as much as possible in the way of minerals and proteins from them, using conventionally raised bones is just going to make a concentrated chemical soup. Don’t go there.
And just for the record, organic/chemical free bones are a cheap way of getting the benefits of organic meat into you. The bones are usually very cheap. I get mine from my farmers market; both the beef and the chicken bones. I usually try and order them in advance.
I use essentially the same method no matter what bones I am using (for the record, I usually make either chicken or beef bone broth as I find these two the most useful in my cooking.) You can mix your bones but most often it’s just one type used.
Uses for bone broths
- As a base for a gravy - Gluten free onion gravy - Slice up a couple of onions and fry in a pan slowly till translucent in coconut oil or duck fat. Add a cup (or more depending on quantity you need) of bone broth and let it reduce stirring occasionally until slightly thickened (about 8 minutes). Season to taste. Great with good sausages!
- As a base for soups.
- As a poaching medium for meats and vegetables.
- As stock in slow cooked/braises such as lamb shank, osso buco or any kind of stew
 As a consume style soup for lunch or breakfast - just warm up a cup of broth, add Himalayan salt and drink. A great meal replacement any time especially if you are trying to give your system some R & R. Don’t skimp on the quality salt. I put half a teaspoon in this cup. It was so good!
Bone Broth recipe
- Take your bones - I usually have enough to 3/4 fill my stock pot. You can roast them for 30 minutes on 175 degrees Celsius to get some extra colour into your broth. I usually do this with my beef bones but not my chicken bones - personal preference. If using beef bones, ask your butcher to cut the marrow bones on up the middle to get a better surface area contact and a mix of marrow bones and the meatier chuck bones makes for great flavour. If using chicken bones, it’s a great idea to throw in a kilo or so of wingettes as they tend to help with the gelling.
- Place the bones in large stock pot and fill with cold filtered water until bones are just covered.
- Add 2 tablespoons of apple cider vinegar. This helps to extract the minerals from the bones.
- Leave to sit for 1 hour and let the acid in the vinegar do it’s thing.
- Place pot on a low heat on stove top. Put on the lid. You want the cooking process to be long
 and slow.
 - Cook chicken bones for up to 12 hours and beef bones up to 24 hours. If you are making fish broth then a maximum of 2 hours will ensure the best flavour. (just a note here - if you are sensitive to histamine, reduce the cooking time to 3 hours for chicken and around 8 hours for beef. If not, you’ll get great results from the longer cooking)
- In the last couple of hours of cooking toss in some vegetables for extra flavour - onions, carrots, herbs and celery are great but any vegetables you like will work. I also like to add some dried seaweed here. Kombu is great as it’s easy to fish out at the end - nice and big, however any type will do as long as it’s from a clean preferably organic source.
- When your stock has cooked long enough, remove the bones to a colander in a bowl and strain the rest through a fine mesh sieve. (You can reuse the bones if you wish although the flavour will not be as strong - use them until they become soft). I am not fussy about removing every single solid but if you want a clear broth, you may want to use a muslin cloth to strain. You may also want to remove any fat from the top but personally, I love the extra healthy fat. It’s all flavour and goodness.
- You can use the broth as is or if you prefer it thicker and with more flavour, place the strained liquid back on the low heat for another couple of hours with the lid off to reduce. You should find that your broth turns to jelly when it cools down. This is the sign of a great broth!
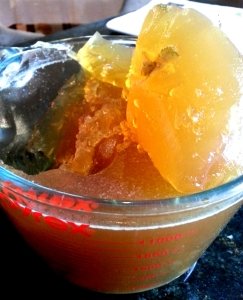
The broth can be stored in the fridge for up to a week or frozen in usable sized lots. Make sure you label your stock if you make more than one type like I do. It’s hard to tell chicken from beef when it’s frozen and liquefied. Take that from one who knows!
Do you make bone broth. What are your secrets? Let me know how you go and if your cooking tastes even more amazing when you add your fabulous home made bone broth.
xx





Leave a Reply